Press-on nails for a wedding day is the right move more often than the internet admits. The salon-versus-press-on debate normally lives in the abstract; on a wedding morning the constraints get real fast. The bride’s hands are photographed at every angle for ten hours, the timeline has zero room for a chip-fix appointment, and the cost of a single mistake — gel cured wrong, a nail lifted before the ceremony, the wrong shape against the dress — is the entire memory of the day.
This guide is the working brief for using press-ons for a wedding: when to apply, what finish photographs the way you want, what to put in a touch-up kit, how to pick the shape against the dress silhouette, and what to do if a nail pops at the worst possible moment. It assumes you’ve already decided press-ons are on the table — if you haven’t, the luxury press-on guide is the right starting point.
Apply the night before — not the morning of
The single most common wedding-day press-on mistake is applying the set on the morning of the ceremony. Three reasons it goes wrong:
- The adhesive needs time to fully cure under the natural nail. A wedding-grade glue bond reaches working strength in roughly an hour and full strength overnight; rushing the cure window is what causes the pop-off in the receiving line.
- The morning timeline is already over-allocated. Hair, makeup, dress, photographs, and the actual ceremony are non-compressible. Nails fight for the same minutes.
- The lighting in a hotel suite at 7am is bad for the close-detail work that good press-on application requires. You’ll see every cuticle gap on camera at noon.
Apply the night before, sleep on satin (not cotton — cotton snags on the free edge), and pack the touch-up kit with the dress.
Choose the finish your photographer will love
Wedding photography is unforgiving on chrome and high-glitter sets. The mirror finish on chrome reflects whatever’s near the hand — bouquet stems, the suit jacket, the lighting fixture in the venue ceiling — and a gem-loaded set throws hot specular highlights that the photographer has to spend the next morning retouching out.
The finishes that consistently photograph well on a wedding day:
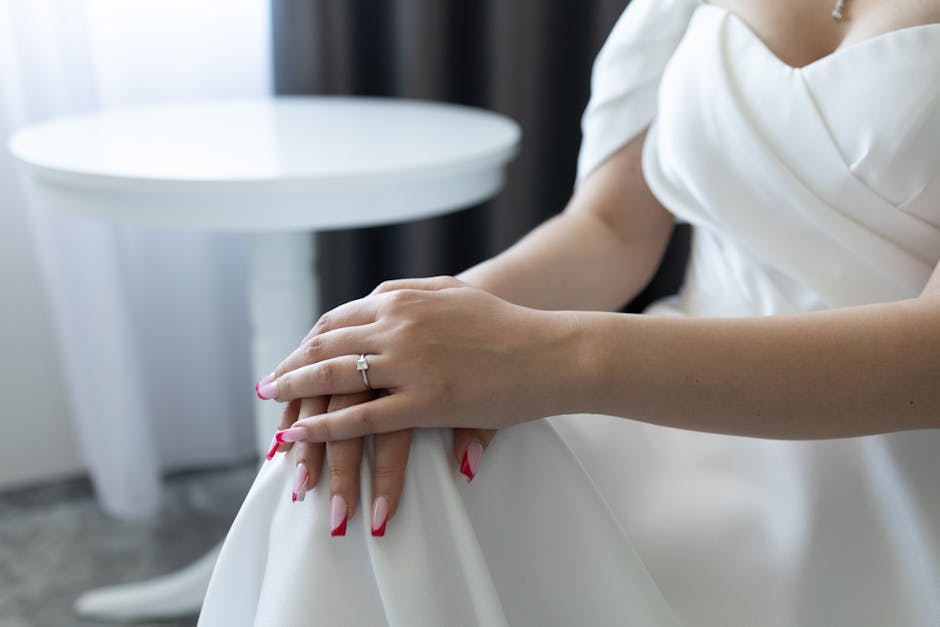
- Soft glaze / “milky” — sheer pink, sheer mocha, glazed-donut whites. Reads expensive on every camera, doesn’t compete with the dress, doesn’t date in five years.
- Classic French — the original “professional bride” finish. White tip on a sheer base. Photographs cleanly under any colour-temperature light.
- Soft ombré — pink-to-white “baby boomer” or nude-to-shimmer. The gradient softens the cuticle line and is the most forgiving design on grow-out for engagement shoots that span weeks.
If you want the high-impact finish anyway, run it past your photographer in the engagement shoot rather than discovering it on the day. The full-design rationale lives in the press-on nail designs guide.
Match shape to dress silhouette
Shape is the lever most brides under-use. The shape that works for a regular Tuesday is rarely the shape that works against a wedding dress.
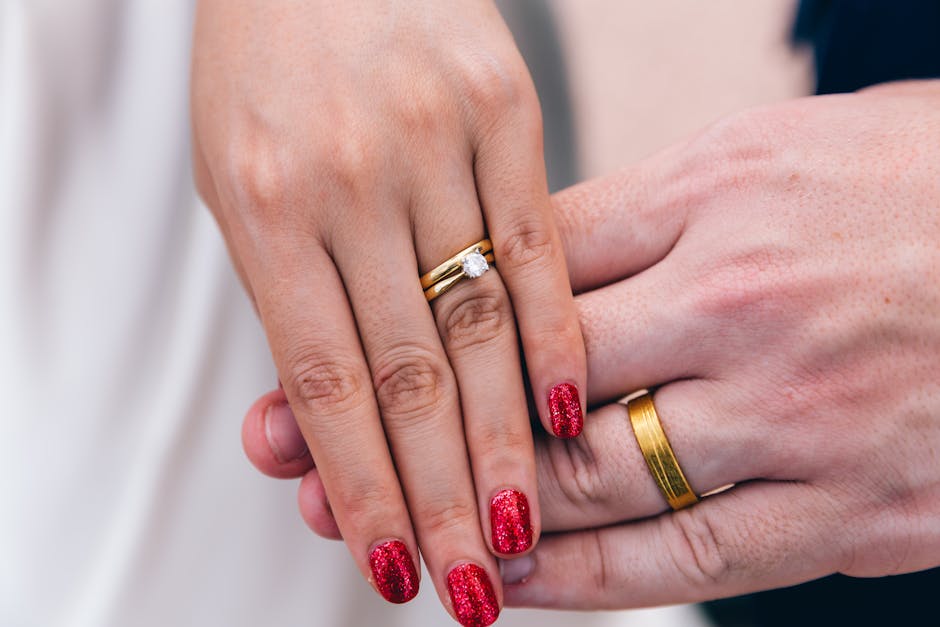
- Almond — the safest wedding shape. Lengthens the finger without going dramatic, photographs beautifully against a fitted sleeve, looks natural with both gloves and a bare arm. Default if you’re undecided.
- Oval — softer, more vintage. Good with a tea-length dress, lace, or a Mediterranean / garden wedding aesthetic. Reads less editorial than almond.
- Coffin (ballerina) — modern, dramatic, photographs as a strong shape. Best with a sleek, structured dress (mermaid, fitted column, modern minimal). Looks out of place against full-skirted ballgowns and lace.
- Square / squoval — flatters short, narrow nail beds. Works with vintage or art-deco-inspired dresses. Reads quieter than almond on camera.
- Stiletto — almost never the right wedding shape. Catches on lace, photographs as costume rather than bridal, fails the “do you want to be holding hands at the ceremony” test.
Build the touch-up kit
The touch-up kit lives in the bridal-party clutch. Whoever is closest to the bride during the day owns it.
- One sachet of brush-on nail glue (not the squeeze tube — sachet single-use is faster under stress).
- One spare set of the same press-ons in the same shape. Two or three nails will do; you don’t need a full set.
- A small nail file — 240/280 grit, fine enough not to damage the surface of the press-on if a free edge catches on a zip.
- A clear top coat — re-glossing a chipped tip buys hours.
- Cuticle oil — re-hydrates the natural nail edge and makes a lifted nail look intentional rather than damaged in photographs while you wait for a moment to fix it.
- One alcohol wipe — clears any oil residue from the nail before re-gluing in an emergency.
The touch-up kit is the difference between “we fixed it in the bathroom in two minutes” and “the photo from the cake-cutting has a missing nail.”
Day-of contingency — what to do if a nail pops
Triage in this order, in roughly under three minutes:
- Find the popped nail if you can. A re-glued original sits flush with the others, where a replacement from the spare set will sit a hair differently.
- Wipe the nail bed and the inside of the press-on with the alcohol wipe. Moisture and oil are why glue fails.
- Apply one bead of brush-on glue to the centre of the natural nail, not the press-on. Press the nail down, count to thirty, hold the pressure straight down rather than rolling.
- If the original is lost or broken, use the spare from the same set, file the free edge to match length, and apply identically.
- Skip the top coat for the first hour. A wet top coat layer over a freshly re-glued nail will prise it back off when you shake hands with the next guest.
If you’ve practised this once during the engagement shoot — or even just during a hen weekend — it takes a minute. If it’s the first attempt, it takes ten and is visible in photographs.
Pick the right set for the day
Wedding-day press-ons should be the most premium press-on you can buy, not the value pack. The cost difference between a $15 press-on set and a $35 set is roughly the difference between “looks salon” and “looks like press-ons” on camera. Specifically: gel-X-style sets in glaze finish, with a soft almond or oval shape, and an underlying ABS-PMMA blend rather than thin ABS — the rationale is in the luxury press-on collection, and the use-case-by-use-case roundup including weddings is in the best press-on nails 2026 roundup.
Application and longevity, briefly
The wedding day is not the day to learn the application technique. Run a full-set practice run two weeks before the wedding using the application guide and the long-lasting press-on playbook. Wear them for a week. You’ll learn whether the shape catches on your dress (rehearsal dinner is a good stress test), whether the finish photographs how you want, and whether the adhesive bond is reaching the level you need on your specific nail bed.
Done well, wedding-day press-ons solve the entire problem the salon was supposed to solve, with no morning appointment, no dryer time, and no risk that the nail you cured at 8am lifts at 6pm. That’s the whole point.
Frequently Asked Questions
When should I apply press-on nails for my wedding?
The night before. Adhesive needs about an hour to reach working strength and overnight to fully cure. Applying on the morning of the ceremony rushes the cure window and fights for the same minutes as hair, makeup, dress and photographs.
What press-on finish photographs best on a wedding day?
Soft glaze ("milky"), classic French, and soft ombré consistently photograph cleanly under any colour-temperature light. Chrome and high-glitter sets throw specular highlights and reflections that the photographer has to spend the next morning retouching out.
What goes in a wedding-day press-on touch-up kit?
One sachet of brush-on glue, two or three spare nails from the same set, a 240/280-grit file, a clear top coat, cuticle oil, and one alcohol wipe. The kit lives in the bridal-party clutch with whoever is closest to the bride during the day.
What do I do if a press-on pops off during the wedding?
Wipe the nail bed and the inside of the press-on with an alcohol wipe, apply one bead of brush-on glue to the centre of the natural nail, press the nail down straight (not rolling) and hold for thirty seconds. Skip top coat for the first hour.